The
American Self Protection Association, Inc.
The
American Self Protection Association, Inc.
Home of America's first Mixed Martial Art Training Method for the Entire Family
Preparation
![]()
![]()
![]()
![]()
|
Home of America's first Mixed Martial Art Training Method for the Entire Family Preparation
|
|
3.0 Preparation Kickboxing is a very complete form of physical training in its own right. Only a few auxiliary exercises, if any, are necessary for conditioning. 3.1 HOW TO APPROACH PHYSICAL CONDITIONING The ability for, and tolerance to, physical exertion vary from person to person. It is, therefore, important to approach training in a way which gradually increases this tolerance without undue strain, exhaustion, or persistent muscle soreness. You are not overdoing it if, at the end of each session, you are feeling pleasantly tired, but not fatigued and, should you get any sore muscles, their soreness will not persist beyond the second day after training. Here enters also a psychological factor: The more you overdo it, the easier you get discouraged. Slow down when necessary but don't give up. No real ability of any kind can be achieved without sustained effort. Depending on age and physical condition you should train two or three times a week. Results are hard to achieve with less training, while training more than three times a week is necessary only if you aim to become a champion. Stamina, or cardiovascular efficiency, understood as the ability of the organism to utilize oxygen efficiently, is one of the main attributes of physical fitness. You can increase your stamina in many ways. In our experience, excellent results are obtained as follows: Start jogging for as long as you can without getting exhausted, then walk fast. Slow down and keep walking until you recuperate, and then jog again. No matter what you do, keep moving continuously for no less than twenty minutes. Persist until you can jog for the full twenty minutes without worrying about how much distance you have covered. Then try to increase your speed without reaching exhaustion. If you are over forty-five, maintain a moderate jogging rhythm for no more than three times a week. Drop down to two if over sixty. Easy does it. Younger people should try running rather than jogging, at least three times a week for no less than twenty minutes each. However, should they reach the twenty minutes jogging level, conscientious training in kickboxing will do the rest. Perhaps you ask yourself what other sports specifically help in kickboxing. Many do indeed, but the most relevant are: ping-pong and fencing for fast eye and reflexes, skiing, dancing, sprinting, broad jump, high jump and soccer for strong legs and a good sense of timing, and last, but not least, training appropriate to boxing. 3.2 EXERCISES WITHOUT APPARATUS No apparatus is necessary for conditioning and there are many exercises to that effect. Since physical conditioning is a vast subject in its own right and this book is devoted to kickboxing, we shall confine ourselves only to some guidelines and a few selected exercises. The interested reader may refer to the many excellent books available on the subject. Guideline 1. Start always with jogging or running as explained above. While they are not quite equivalent, you may substitute twenty minutes of swimming for twenty minutes of running, but a pool is not always available to everyone and drying and changing clothes is necessary before proceeding further. Guideline 2. Your next step should be stretching and limbering up. Some exercises are given below. Guideline 3. You may proceed now either with isometrics or with exercises requiring apparatus or directly with kickboxing training. If you want to train safely and avoid muscular aches and pains, as well as undue strain on the heart, follow this sequence very conscientiously and never skip warming up. Guideline 4. Take a few minutes to practice relaxation after your training is over. Although not indispensable, you will derive great benefits from it. 3.2.1 Stretching and Limbering Exercises These are necessary to prepare the joints for punching and kicking, which call for continuous flexion and extension. 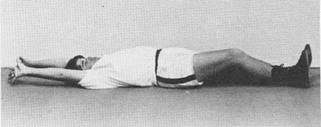
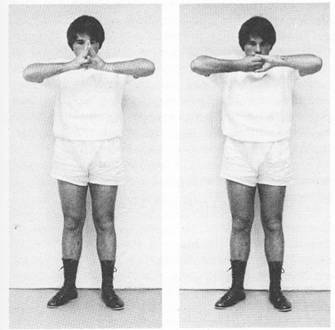
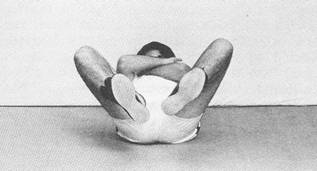
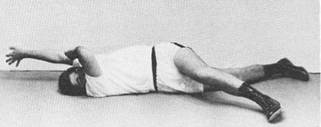 Stretch and Twist shown above II. "Locomotive" This exercise stretches mainly the upper part of the spine. Sit on the floor, roll on your back, and with chin on chest stretch gently trying to touch the working area (mat preferably) with your toes. You may not be able to achieve this initially. Do not insist, but work gradually toward this goal. Reach with your toes as far as you can and stay there for at least ten seconds. Then roll back into the sitting position and grasp all your toes with the corresponding fingers, elbows between knees. Extend right leg and arm as far as you comfortably can, then some more. The arm resists the extension of the leg, while the head turns to the left as far as possible. The right leg then comes back to the initial position, and the left leg and arm are extended as the head turns to the right as far as possible. This alternate extension and bending of the legs is repeated at least ten times; then both legs are extended, with the fingers still holding the toes. An effort is made to bend the head as much as possible, so the the chin touches the chest. Stay in this position for ten seconds. The whole process is repeated twice. I. "Stretch and Twist" Lie on your back and extend arms above head while you stretch the body, toes curled up and heels jutting out. Push your hips alternately in the direction of your heels, so that one leg stretches longer than the other in succession. Do these motions for at least five seconds (counting one second, two seconds, etc.). Stretch well, then go limp. Repeat once more. Now, extend arms alongside body, fingers curled in, wrists bent upwards, and repeat with shoulders and hips a similar motion. Finally, extend arms and turn shoulders in one direction as you switch and gently twist hips by crossing legs and turning head in the opposite direction. Same duration as the first part of the exercise. 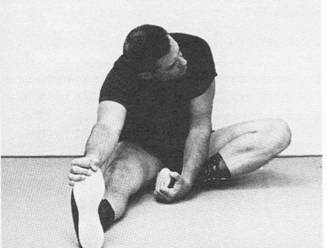 Locomotive Bellows 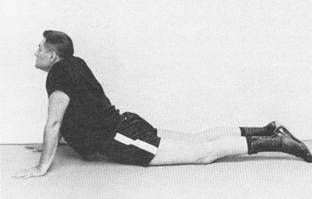 III. "Bellows" Lie face downward, head turned to the left, right cheek touching the working area, and put your palms flat on the working area at shoulder level. Exhale completely pulling your abdomen in hard, for a count of ten; then inhale as you push up and bring the arms to complete extension. The hips are relaxed and in contact with the working area. The inhalation accompanying this movement is done at your own rhythm (as an example only, it might last three seconds); then hold your breath in this extended position for, let us say, twenty seconds. Exhale as you come back to the initial position for a count of ten (20:2) seconds turning your head to the right now. This cycle is repeated at least six times. Upon completion, the arms are extended alongside the body, palms facing up. Relax for two or three minutes, breathing calmly. This exercise bends the spine in the opposite direction of the "locomotive." It induces also an excellent abdominal massage, which can be made more efficient by inserting a thin, hard pillow under the abdomen. The "bellows" may be followed by a number of push-ups from the same position, inhaling while pushing up and exhaling while coming down, continuously to the maximum of your ability. Care must be taken that rhythm permits thorough exhalations. Following this, you relax as above. A good target is one hundred such push-ups. 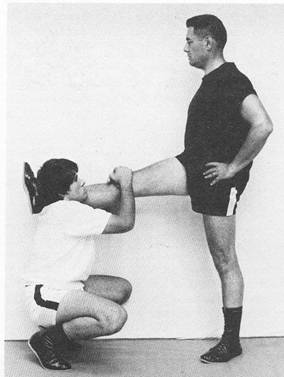 With a Partner - A IV. "With a Partner" A. Stand with your back against a wall and have a partner about as tall as you face you at the distance of a big step. Let him squat and place your right heel on his left shoulder. Crossing his fingers above your knee he presses it down, in order to keep your leg straight. Now he gets up slowly to 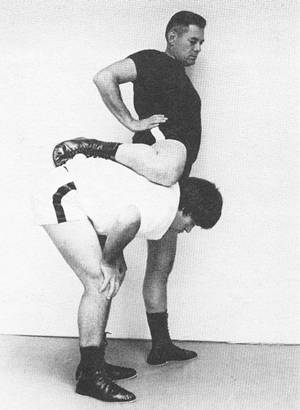 With a Partner -B the point where you ask him to stop. As he stretches your right leg, keep your back as straight as possible, well against the wall. The entire sole of your left foot remains flat on the floor. Do not stand on your toes. Repeat for the other leg. B. Stand with your left side against a wall. Get your partner to squat by your side, facing the same direction. Bend the right leg and put the knee just below his nape, so that the shinbone rests on his spine. Put right hand on right hip and push it out so that the knee, hip and abdomen are all in the same plane. Now your partner stands up slowly, stretching your legs apart until you ask him to stop. The sole of the left foot must remain flat on the floor throughout the exercise. Repeat for the other leg. 3.2.2 Selected Isometrics (No Movement Exercises) I. For the Shoulders, the Elbows and the Neck Lie down facing the mat and stretch legs joined together, toes resting on the mat. Put palms flat on the mat on each side of the hips, fingers pointing in the direction of the toes. Your elbows are bent and close to the sides. Press your hands down hard as if you were trying to flex your elbows. At the same 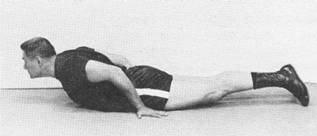 Selected Isometrics 1 time, tilt your head back and tense the muscles of the neck. Stay motionless for a count of seven seconds (counting one second, two seconds, etc.), exerting yourself fully in this position. II. For the Fingers, the Upper Chest and the Neck Stand at ease, feet slightly apart, and touch the fingertips of one hand with those of the other. Lift hands and elbows so that they are in the same horizontal plane with the shoulders, and press, as hard as you can, the fingertips against each other for a count of seven seconds. Now hook your fingers and pull them apart for the same count. Tense the neck muscles throughout the exercise. 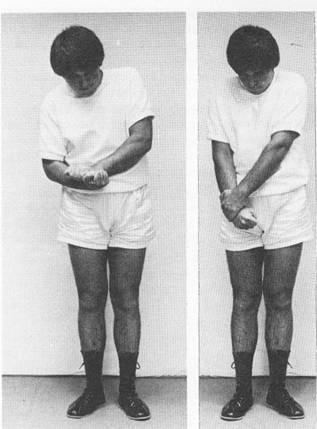
Selected Isometrics II (top 2), III, IV III. For the Arms Close the fists and put left wrist facing down against... IV. For the Arms Grab left wrist with the right hand, palms facing body. Pull away to the left with left wrist and oppose motion with right hand. There are many isometric exercises, but they are beyond the scope of this book. Isometrics taken together with exercises for cardiovascular efficiency, such as running and swimming, are perhaps the best method to maintain a satisfactory level of physical fitness. To be effective, however, they must be practiced with maximum concentration of strength over their brief duration. 3.3 EXERCISES WITH APPARATUS 3.3.1 Skipping Rope Increases both endurance and agility. If you can work at least five minutes a day, every day, there is hardly a simpler exercise for developing endurance, agility, gracefulness in motion and a sense of rhythm. Close fists and put left wrist facing down against right wrist facing up. Press down hard with left wrist and resist push with right wrist. Switch positions and repeat, always for a count of seven seconds. 3.3.2 Weights Training with weights can be very beneficial. The versatility of weight training has been conclusively demonstrated. One may not only develop power and correct his weak spots, but also gain weight, lose weight and develop a well-proportioned physique. All this can be achieved without becoming "muscle bound" and losing speed. Weight training is an extensive subject and cannot be treated within the limits of this book. Despite its great benefits, weight training without expert guidance and an especially tailored program is not recommended, for it may do more harm than good. 3.3.3 Punching Ball and Sandbag Both should be adjustable in height, so that they can be used for punches and for kicks. Punching ball develops a fast eye and speed. Use the type which can be attached to the ceiling and floor. Sandbag training develops powerful punches, particularly useful for in-fighting. It helps develop concentration of power with appropriate timing at the point of impact. Sandbag training is not however, recommended for beginners, since they cannot deliver their blows in full balance and with reasonable accuracy. These two attributes must be developed first, before one thinks of developing power. Training with a punching and striking board is not recommended, not only because it does not offer the versatility of the punching ball and sandbag, but also because it is a rather static form of training. It can be used, however, if nothing else is available. 3.4 CONSIDERATIONS ON DEVELOPING POWERFUL PUNCHES AND KICKS It is a fallacy to believe that the ability to deliver powerful punches and kicks is meaningful without first developing accuracy together with excellent balance, not only during delivery but also during the recovery which follows. Failure to realize this will invariably result in lack of mobility and a stilted style. Power is of the utmost importance, but only in its proper place. As mentioned earlier, power is developed according to the principles of leverage and momentum. The very use of our body implies leverage, so there is no need to belabor the point. The use of momentum, however, needs to be clarified. Momentum has two basic components: an element of speed and an element of acceleration. Acceleration means that the speed of the attack steadily increases as it travels toward the target. Such momentum will be effective if it is transferred as completely as possible to the target at the point of impact. The smaller the area where this transfer takes place, the more destructive the impact will be. This is elementary physics. Therefore, as long as the various parts of the body involved in delivering an attack abide by these principles, the attack will be destructive, assuming that it is accurate. This explains why boxers can and do deliver very destructive punches, as many unfortunate deaths in the ring have proved. Boxers have failed to develop showmanship in this area, unlike karate experts, by not indulging in breaking boards, bricks and miscellaneous second-rate building materials. It follows from the foregoing that any powerful attack must of necessity start with as little tension as possible in the attacking limb, then develop momentum by smooth coordination of all parts of the body involved, and finally culminate in full tension at the point of impact. The smaller the area over which the developed momentum* is transferred, the more destructive the attack. The more tense the attacking limb at the point of impact, the less give it will have and the more penetrating the attack will be. Training in our system is consistent with the foregoing and is aimed at developing, in order, balance, accuracy and power. Now a few words about relaxation. Among the many benefits derived from the practice of relaxation are a better sense of balance, better coordination and an increased ability to develop momentum and to transfer it efficiently. Breathing is directly related to stamina and to relaxation. Ever notice how your breath becomes shallow under tension and how much faster you get exhausted? The degree of relaxation in the performance of any skill is directly proportional to the degree of its mastery. Whether you drive a car or perform on parallel bars, the more experience you have, the less tense you will be. And, up to a point, the less tense you are, the faster your reflexes. We feel that the practice of relaxation is pertinent to many sports and particularly so to kickboxing. In view of space limitations, only one relaxation exercise is given. 3.5 CONCENTRATION-RELAXATION The following detailed instructions are meant to help beginners. With practice you can relax at will. At any rate, if concentration is important for all activities, it is absolutely essential for relaxation. Concentration on a given subject is not achieved by thinking hard about it, but by thinking about it to the exclusion of everything else. In other words, we concentrate on one subject by keeping it alone in our mind, and not by forcing it there among other things. If, for instance, we want to concentrate on relaxation, we shall succeed in doing so by eliminating from our thoughts everything creeping in that is not relaxation. Since our mind cannot remain empty for very long, relaxation will be the only subject to occupy it (* More accurately, kinetic energy). Naturally, this is not very easy, but it can be achieved with moderate practice. Relaxation will be complete in direct proportion to the concentration achieved. Lie down and make sure that nothing which may distract you is in contact with your body. The spine must be as straight as possible and the weight evenly distributed. Otherwise an imbalance will occur which, as always, is accompanied by muscular tension. You must feel comfortable and you are the only one to judge which minor adjustments to the guiding principles given here will help you to achieve this goal. Now place hands, palms down, on either side of the groin*. In this position take three deep breaths as an introduction to calm breathing essential to relaxation. Look at a point on the ceiling, address yourself by your name and say: " , you are going now to relax for fifteen minutes; after this your muscles will come back to their normal tone and you will feel wonderful and rested. Close your eyes and say to yourself: "I am now breathing calmly, I am relaxing." Breathing calmly, without any effort to control your breath, direct your gaze toward the general direction of the tip of your nose. This will help you to concentrate. Start relaxing muscle groups in the following order: Muscles of the scalp. Say: "I am relaxing the muscles of my scalp. Now the muscles of my scalp are completely relaxed." Then proceed with the muscles of the forehead, then with those around the eye sockets. The latter are a key group of muscles which must be carefully controlled. Direct your gaze through your closed eyes toward the general direction of the tip of the nose at all times. This will help you to slow down mental agitation, since closed eyes tend to wander with wandering thoughts. Then, proceed with the muscles of the cheeks, the jaw (a key group) and the back of the neck (another key group). The jaw must be kept in such position that the tips of the upper teeth touch the upper part of the lower lip; thus you will breathe through the nose, your throat will not dry up, and you will relax your jaw easier. Now you have completed the relaxation of an important area, your head and neck. Visualize that somebody lifts your head and then lets go: your head falls back lifeless. We shall refer to this process as "lifeless visualization." It helps very much to attain relaxation. During all this time breathe evenly and calmly. Continue with the upper left arm, the forearm, the hand and fingers (a key group), and then proceed with "lifeless visualization" of the left arm. * Some people find it easier to keep a pillow under their head and to place their arms on each side of it. Soft music may also help by minimizing mental agitation. Proceed similarly with the right arm, the torso, the abdomen, the hips (lumbar region - a key group) and then the legs, each time ending up with "lifeless visualization." At the end, visualize your whole body as being lifted and hanging like a rag doll. Keep breathing calmly and at all times, effortlessly direct your gaze towards the tip of the nose. As a help for keeping your mind from wandering, either repeat the above sequence, or continuously repeat after the last "lifeless visualization," "My mind is blank," and "My body is relaxed." You will go through various stages of relaxation, as you will discover, and with practice you may reach the most complete stage. When your skeletal muscles start relaxing, you will be rather uncomfortable: they are so used to being tense that you will feel them twitching and restless. Do not give in to the temptation to get it over with. After a time you will go through the second stage of the relaxation process and feel your body getting heavy. At this stage, if you want to move any muscle, it will take a fraction of a second before its normal tone is restored. In the third stage of relaxation you will feel very light, and you will be able to control involuntary muscles to some extent. It is a wonderful sensation. It takes some practice to reach that stage, but it is well worth the effort. Keep in mind that it is very unlikely you will be able to relax while sitting, and even less likely while standing and moving, if you do not first master relaxation in the lying position. Relaxation is different from self-hypnosis. The mechanism of sleep is also different from that of relaxation. One may sleep without being muscularly relaxed. It is well known that tired soldiers can sleep standing and even marching. Mastering relaxation will allow you to go to sleep easily, but only when you so desire. Again, this technique is helpful to beginners. With some experience one can relax instantly without taking the above steps. Concentration-Relaxation offers all the benefits claimed by the various forms of "meditation," and when practiced in this context, much more. 3.6 SAFETY It is pertinent to say a few words about safety, the importance of which can hardly be overemphasized. Safety is a prime consideration, not only from a liability standpoint, but also as a determining factor for the growth of any sport. Since the existing myths about the various forms of foot fighting tend to scare many people away, it behooves us to prove that our kickboxing system is truly accessible and safe for anyone to practice while still offering a true challenge to the fighter and a meaningful method of self-defense to the average practitioner. Although one may achieve a certain degree of proficiency without it, free sparring is the touchstone of ability in kickboxing. It is, therefore, important that both free sparring and self-defense be practiced safely and purposefully in relation to the attributes of balance, accuracy, speed and, eventually, power. How this can be achieved will gradually become apparent. Since falls are always possible in kickboxing, knowing how to fall safely is a necessity. All falls must be practiced on a mat first. After mastering the rolls, practice them on a hard surface. 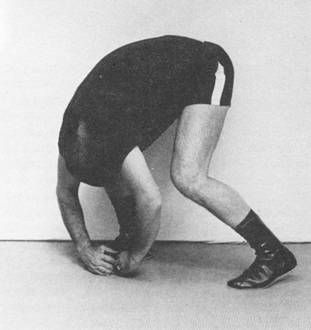 Right Forward Rolling Fall 3.6.1 The Art of Falling Safely The various forms of falling safely used in kickboxing are essentially similar to those used in other forms of fighting arts, since there are not many ways to break a fall or to roll safely. One of the advantages of this system is that the student can start immediately working on the techniques without preliminaries such as learning how to fall. He has ample time to learn them while he progresses in the course proper, so that his interest remains sustained. Initially he may feel somewhat confused because he is asked to use "unnatural" reactions. He must rest assured that within a short time he will familiarize himself with the use of the principles of direction, distance, leverage, momentum and timing, and that by repetition throughout the system he will develop conditioned reflexes in accordance with these principles. Like other techniques in this book, falling is described on one side only. In practice, however, it must be followed immediately by the other side. There is no exception to this rule: being ambidextrous is essential. I. Rolling Falls Rolling falls are the most important of falls and must be studied very carefully. This is particularly true of the forward rolls, which may be used for defense as well as for attack. A. Right Forward. Stand relaxed, feet shoulder wide, and step forward with the right foot; this step should be somewhat longer than a normal step. Now pivot on the balls of your feet so that the toes point slightly inward. Lift right arm straight above head, relax your wrist and let it bend, fingers pointing straight ahead. Fix your head in a forward bent position by directing your gaze toward your upper chest, without tensing up the muscles of your neck. Looking there will keep Right Forward Rolling Fall your head in a position protected throughout the roll. In a reaching motion, again without tensing up, propel your body forward with the left foot, using the ball of the right foot only as a support. Failure to follow these instructions will make you roll sideways. Your left hand is placed in the extension of the right and the arms form a circle, as the sides of both hands, lightly closed into fists, land on the working area near the inside of the right foot. The body is propelled forward and rolls diagonally from back right shoulder to left hip. The left leg, acting as flywheel, is extended as it passes from the vertical, and then is folded behind the right so that, upon landing, the right foot is forward. Get up using your forward momentum. Positioning the feet properly is essential for easy recovery. Practice slowly at first, then increase your speed. As you familiarize yourself with this technique, do not stop after one roll, but take several in succession. Next take a jumping step with the left foot and roll as above while reaching with your right arm as far forward as you can, until your roll becomes a lunge and roll. After this step is mastered, start lunge-rolling over obstacles, such as someone on all fours. This is a must for any one who wants to progress in kickboxing. This is not a stunt and should not be considered as one. Besides its use in actual self-defense, it has an important psychosomatic effect. It trains your mind to think beyond obstacles and to lead the body to the limits of its performance capabilities. Many who thought it impossible to lunge-roll over one person found, to their amazement, that they could go over three, four, or even seven persons. The secret lies in thinking beyond the obstacle; if your mind stops at the obstacle, your body will also. By thinking beyond the obstacle, your body will follow to the limit of its capabilities. In short, if you do not have the physical aptitude, you may not be able to lunge-roll over seven people, but in any case you will be able to test your true capabilities only by maintaining a forward mental approach. Thinking beyond obstacles is essential in all endeavors. Finally, after each lunge-roll keep rolling to the limit of available space and don't forget to practice on the left side following the right. B. Side Roll and Pivot. Lie on your back, extend arms above head, in line with legs, and start rolling to the left to the limit of available space. An indication of your degree of relaxation is the ability to roll parallel to your initial extended position, without angling from it. If you are not relaxed you will not be able to achieve this easily. Practice on both sides, increasing gradually your speed to the limit of your capabilities. Now you are ready for the next step. Roll completely once 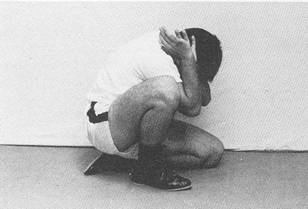 Back Roll 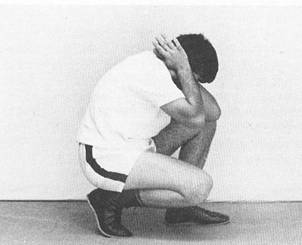 Back Roll (variation) 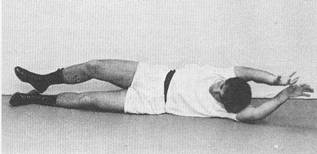
Side Roll and Pivot C. Back Roll. Take the same beginning posture as for forward roll. Taking one step back with the left foot, bend knees to squat and, chin on chest, roll back as if you were trying to throw both hands over the right shoulder. In the process, the left instep is set on the mat and supports the weight of the body and you roll over diagonally from the right shoulder to the left hip. When you get up, your right foot is forward. Practice right and left. Then sit on a stool, break your balance backwards and roll. If you wish, you may try this technique from a chair. Make sure to choose a chair which won't injure your back during the fall. A variation of the back roll is shown. to the left, then pivot on your back sharply to the right, facing perpendicularly to the starting position. Simultaneously tuck in your chin, close your fists and cross the forearms on the chest, placing the back of the hands against the sides of the neck. Repeat this after rolling from twice up to six times. As usual, practice on both sides. ll. Flat Falls Must be studied on a mat. A. Forward Break fall. Kneel on the working area, toes curled up and in contact with it. Relax and drop shoulders; swing arms together back and 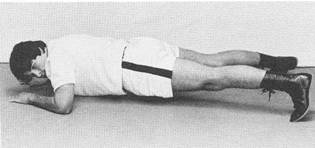 Forward Flat Breakfall forth a few times. In the process bend elbows and keep them low, thus bringing open hands in front of face, palms facing forward, forefinger tips close to each other. Forearms must be parallel to the body. Do this a few times to familiarize yourself with the movement, then fall face down, straight from the knees, breaking the fall with the whole length of the forearms and open hands. Keep relaxed and do not try reaching for the working area as you fall, since this will destroy your timing. After mastering this breakfall from the kneeling position, try it from the standing position. The knees should not hit the mat: spread your legs apart and land on your toes. Properly performed, this technique will not hurt the elbows, even on a hard surface. down, when the small of the back touches the mat. Do not reach for it, otherwise you will destroy the timing. You may practice timing by sitting on the mat, rolling back gently and striking when the small of the back hits the mat. Once you have mastered the breakfall as described above, try it from the standing position by jumping back and breaking the fall. Finally, have a partner push you, and break the fall. The chin must be on the chest so as to prevent the back of the head from hitting the working area. Our body is an elastic medium: vibrations created by the impact of a fall travel through it and reach the brain, thus creating dizziness. Besides, the impact of the fall may cause a bruise or even a more serious injury. Protecting oneself from the effects of a fall entails two things: first, positioning the body so that vital parts are not exposed to the impact, second, preventing the vibrations generated by the fall from reaching the brain. The latter requirement is achieved by creating another set of vibrations of a different period which, traveling also through the body, will offset by interference the vibrations from the fall. Striking the mat with extended arms and/or with the heels brings about this effect. On a hard surface, heel striking should be emphasized, for the heels are usually protected by shoes and therefore less vulnerable.  Back Flat Breakfall B. Back Break fall. Stand up and bring your extended arms at shoulder height, palms facing down. Relax shoulders and gathering momentum, whip back both arms, letting them go as far as their momentum will carry. Repeat this several times to get the feel of the whipping action with which the extended arms must strike the mat. Now, squat as you lift the arms, chin on chest, as previously, and roll back striking the mat with a whip-like motion. Arms should land, palms down at an angle approximately 30° from the sides. Chin must be on the chest to the end of the technique. Strike, palms C. Right and Left Side Breakfalls. After the previous breakfall has been mastered, it is a relatively easy thing to master the side breakfalls. As you jump, shift to your right or left side breaking the fall with the corresponding arm in exactly the same fashion. Do not cross the legs as you fall, but try to keep them at almost right angles. Such positioning prevents the knees from hitting each other. For instance, for the right side breakfall, the right side and the side of the right leg, slightly bent, are in contact with the mat. The left foot is on the left of the right foot, sole flat on the working area. The left leg is bent in a plane almost perpendicular to that of the right leg. 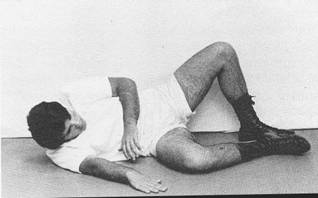 Side Breakfall 3.7 TEACHING AND OTHER GUIDELINES This book is also designed for teaching. Teaching efficiency depends greatly on a methodical imparting of knowledge to students. In a field such as the fighting arts and sports, where the possible combinations and permutations are almost infinite in number, a teacher has to face two formidable tasks: selecting from among a great number of techniques the simplest and most efficient, while limiting the selection in such manner as not to confuse his students; and preparing his students to receive more advanced knowledge by conditioning their minds and bodies gradually. It is recognized that no textbook will ever replace a good teacher; however, depending on its planning, a textbook may either help or impede. The mental attitude with which training must be approached combines sportsmanship and detachment. The main difficulty in practicing a combative sport is to attack realistically but without hurting one's partner. Unless the attack is meant, one cannot be expected to practice the defensive technique properly. It is quite possible to achieve this by attacking in relaxation, aiming accurately at the target area, and carrying the momentum through. If the evasive action is unsuccessful, the momentum should be stopped to give only a gentle contact. Ambidextrous practice is an absolute must, one side immediately following the other. In this book only one side is described, the instruction must be reversed for the other side. The tempo, slow at first, is gradually increased to normal speed; finally, free sparing is introduced as a necessary part of advanced training. When self-defensive techniques are studied, the attacker stops his attack when its first impact is foiled and he comes under the control of the defender. Cooperation between participants is essential and training should never become a pretext for a free-for-all. Light contact in striking and kicking techniques is recommended during training because it teaches the attacker to control his attack and the defender to accept some degree of punishment. If what we have said so far means that you have to practice, practice, and practice again, it also means that it is to your disadvantage to spread yourself thin over a large number of techniques. Rather, it is best to concentrate on a few versatile and efficacious ones. Speed, which enables you to take advantage of any open target, is related to good reflexes and proper timing. It is not, however, sufficient in itself without accuracy. You must see, react and be able to properly judge the distance and the direction of your target. To accomplish this, your field of vision must encompass all of your opponent's body and motions. When you train with a partner, get into the habit of looking through his upper chest. Focus your eyes beyond him, as if he were made out of glass. Finally, remember that relaxation accelerates tremendously recuperative processes. |
|
Send mail to
troyschultz@yahoo.com with
questions or comments about this web site. |